Bringing data-driven applications to a containerized distributed platform can present many challenges for a developer. Probably one of the largest issues to contend with when approaching a cloud native platform with these applications is the compute resources associated with your chosen data processing framework. These frameworks often carry an associated technical debt when it comes to deploying and managing them that can be a serious detractor to enabling an exciting data science environment for developers.
Although it’s certainly fair to keep the bulk of the processing framework outside your container platform, this also creates a bifurcated environment for your operations teams to manage. If the processing framework can be provided in a manner that makes it easy to deploy and utilize then developers have a quicker path to the juicy parts of their applications, namely the analytics.
The team that I’ve been working with at Red Hat has been looking at this problem on several platforms and with different processing frameworks, and recently we have created a project to make deploying and managing Apache Spark clusters on OpenShift much easier for application developers; Oshinko. The end result is that using the Oshinko project gives users the capability to quickly create, scale, and delete containerized Spark clusters.
There are several components to the Oshinko project: a rest server, web based user interface, and source-to-image builders. In this post I’m going to cover how you can install and interact with the Oshinko server through the browser interface. The work here is all based on OpenShift, and as such you’ll need access to a deploymnet or have a machine to run one of the all-in-one deployment options available.
To begin with, I’m going to install Oshinko into an existing OpenShift project
that I have by using the oshinko-deploy.sh script from the
rest server repository in
the tools directory. This script makes heavy use of the oc command
provided by OpenShift. (you can build your own version of oc from the
OpenShift Origin project if you don’t
already have it)
$ ./oshinko-deploy.sh -c https://10.19.47.7:8443 -p blog-post -u elmiko
Logged into "https://10.19.47.7:8443" as "elmiko" using existing credentials.

You have access to the following projects and can switch between them with 'oc project <projectname>':

    abd-eu-demo
    abd-test
    oph
    ophicleide
  * oshinko-tests
    sprint-demo

Using project "oshinko-tests".
Already on project "blog-post" on server "https://10.19.47.7:8443".
serviceaccount "oshinko" created
template "oshinko" created
template "oshinko-pyspark-build-dc" created
--> Deploying template oshinko

     * With parameters:
        * OSHINKO_SERVER_IMAGE=radanalyticsio/oshinko-rest
        * OSHINKO_SERVER_NAME=oshinko-rest
        * OSHINKO_CLUSTER_IMAGE=radanalyticsio/openshift-spark
        * OSHINKO_WEB_NAME=oshinko-web
        * OSHINKO_WEB_IMAGE=radanalyticsio/oshinko-webui
        * OSHINKO_WEB_ROUTE_HOSTNAME=
        * OSHINKO_DEPLOYMENT_NAME=oshinko

--> Creating resources ...
    service "oshinko-rest" created
    service "oshinko-web" created
    configmap "oshinko-cluster-configs" created
    deploymentconfig "oshinko" created
    route "oshinko-web" created
--> Success
    Run 'oc status' to view your app.
Let’s break down the command that was issued:
$ ./oshinko-deploy.sh -c https://10.19.47.7:8443 -p blog-post -u elmiko
With these command line options, the oshinko-deploy.sh script will
attempt to install the Oshinko project tooling into the OpenShift cluster
available at https://10.19.47.7:8443, in the project named
blog-post (which will be created if it does not exist), as the user
elmiko (you will be prompted for credentials if you have not already logged
into OpenShift).
Pretty simple, right? Let’s dive a little deeper into what the script is doing internally.
- login to the specified cluster as the requested user
- create and switch to the requested project
- create a service account for the Oshinko rest server to operate with (this is to allow the server to create new objects against Kubernetes and OpenShift)
- grant proper permissions to the service account user so that it has the capabilities to perform said work
- create a template for the oshinko-rest and oshinko-webui deployments, services, and route
- create a template for Oshinko pyspark build deployers
- instantiate a new instance of the Oshinko pod from the template in step 5
At this point, the Oshinko rest server and webui should be installed in our project, let’s take a look at the console to see what’s there.
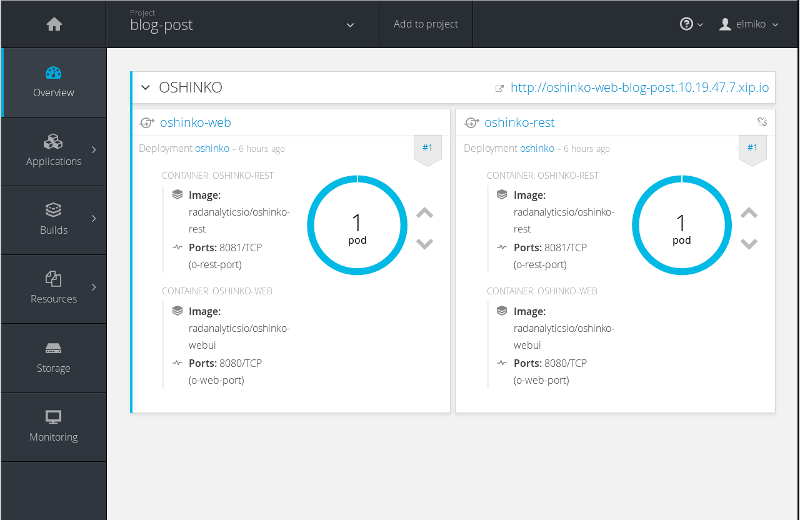
We can see that we now have a pod running with 2 containers and matching services as well as an exposed route to the webui. Let’s quickly look at the Oshinko webui and deploy an Apache Spark cluster.
note: this webui is an experimental front end for the rest server and will change in the future
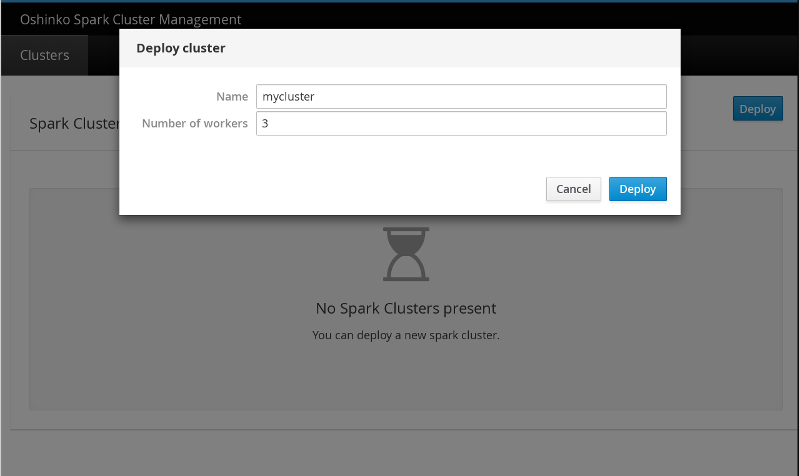
This webui is very simple to operate, and I have clicked the deploy button on
the main page to bring up this modal window. I have named the cluster
mycluster and given it 3 worker nodes (it will have a single master by
default).
If I jump over to the OpenShift console, I can see the pods that have been deployed.
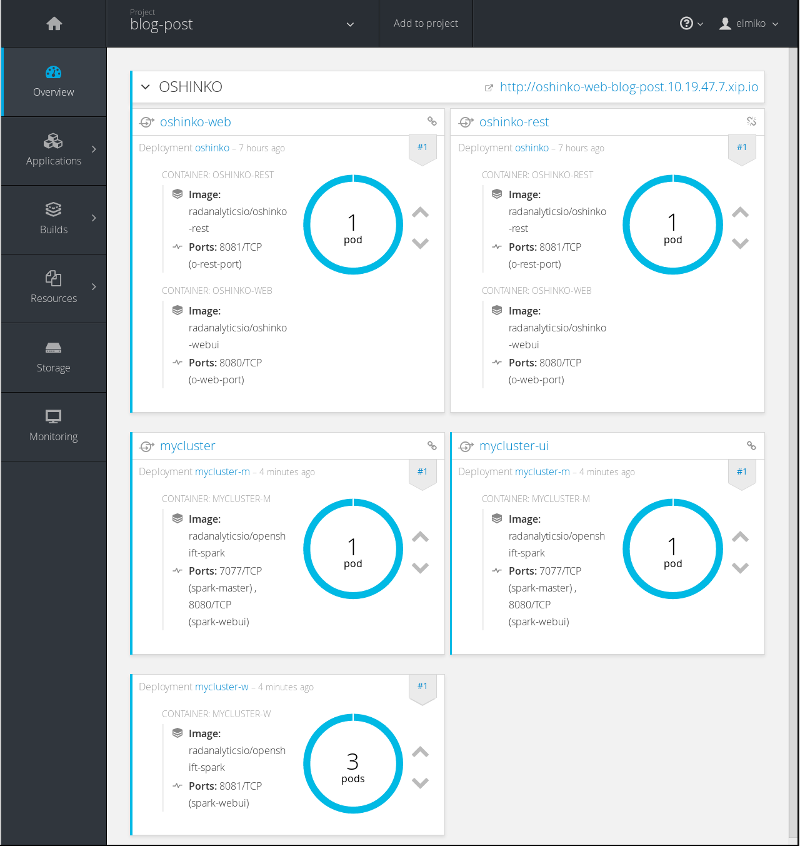
Great! my cluster is up and running and has exposed services for the Spark
master webui and the programmatic master URL, which in this case will use
the name of the cluster I provided; spark://mycluster:7077. This last bit
is very important for applications that I will deploy into this project as I
will always be able to use a predictable name in the master URL for my Spark
driver applications to attach.
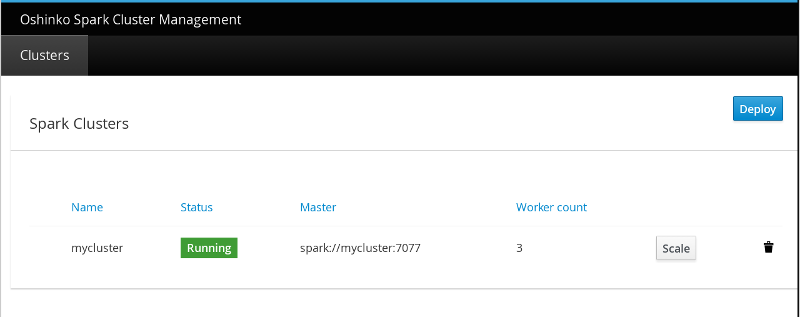
If you revisit the Oshinko webui at this point, you will notice there is more information about the deployed cluster as well options to scale or delete the cluster.
This is really just the tip of the iceberg in terms of what you can do with
oshinko-deploy.sh. Let’s look at the options available from the usage
text:
$ ./oshinko-deploy.sh -h
usage: oshinko-deploy.sh [options]

deploy the oshinko suite into a running OpenShift cluster

optional arguments:
  -h            show this help message
  -d            create an all-in-one docker OpenShift on localhost
  -c CLUSTER    OpenShift cluster url to login against (default: https://localhost:8443)
  -u USER       OpenShift user to run commands as (default: myproject)
  -p PROJECT    OpenShift project name to install oshinko into (default: developer)
  -s IMAGE      spark docker image to use for clusters (default: radanalyticsio/openshift-spark)
  -w IMAGE      oshinko-webui docker image to use for deployment (default: radanalyticsio/oshinko-webui)
  -r IMAGE      oshinko-rest docker image to use for deployment (default: radanalyticsio/oshinko-rest)
  -o HOSTNAME   hostname to use in exposed route to oshinko-web
  -t TEMPLATE   an OpenShift template file to deploy oshinko (default: tools/server-ui-template.yaml curl'd from upstream)
  -i            do not load the oshinko s2i templates into the project (default: curl from the oshinko-s2i upstream repo)
Ok, that’s a lot of options, some of which won’t be directly useful for most users. But, I’d like to highlight a few of these options.
-d allows you to automatically deploy OpenShift on your host using the
oc cluster up command,
see my previous post for more info.
This greatly simplifies the development process if you either don’t have
access to a running OpenShift cluster, or if you would like to try it out in
a developer environment.
-s gives you the opportunity to specify an alternate image to use for the
Apache Spark that is deployed by Oshinko. By default this script will use the
Spark image maintained by our group which is stored in the Docker hub registry
at docker.io/radanalyticsio/openshift-spark. If you need to install extra
libraries or tooling on your Spark cluster this is a great option. I highly
recommend inspecting the
source files for creating
these images as there are several OpenShift specific tweaks that are needed
for a proper deployment.
If you’ve made it this far, I commend you. This post got a little long winded but I hope you have found it useful in exploring the options for using Apache Spark on the OpenShift platform.
Enjoy, and as always, happy hacking!