I’ve been inspecting the tooling around the radanalytics.io Jupyter notebooks and I’m very curious about how we can automatically deploy Apache Spark with these notebooks templates. We already have some great tooling around the source-to-image workflow in the area and it seems like notebooks with compute is a hot topic.
To that end, I have been experimenting with the bits of how to connect these pieces and I’ve come upon a workflow that I think we can capture in the community tooling. In this article, I am just going to outline some of the manual steps I am taking, my hope is that we can automate this process in the near future.
Overview
These are the basic steps I need to take to make this happen:
- Launch a notebook
- Create a ConfigMap for the Spark cluster configuration
- Launch a Spark cluster
- Connect the notebook to the cluster
Launch a notebook
After installing the radanalytics.io bits,
I then launch my notebook using the template radanalytics-jupyter-notebook.
$ oc new-app radanalytics-jupyter-notebook -p JUPYTER_NOTEBOOK_PASSWORD=secret -p NAME=notebook
--> Deploying template "jup/radanalytics-jupyter-notebook" to project jup

     Jupyter Notebook
     ---------
     Launch a Jupyter notebook

     * With parameters:
     * NAME=notebook
     * JUPYTER_NOTEBOOK_PASSWORD=secret
     * JUPYTER_NOTEBOOK_X_INCLUDE=

 --> Creating resources ...
     service "notebook" created
     route "notebook" created
     deploymentconfig "notebook" created
 --> Success
     Access your application via route 'notebook-jup.shift.opb.studios'
     Run 'oc status' to view your app.
You can see that I used the -p NAME=notebook argument when creating my
deployment. I did this so that I can have a consistent name for my Jupyter
pieces on OpenShift. This will help me when creating the ConfigMap for my
Spark cluster. I could have dropped this bit and the template would have
randomly generated a name for me.
Create a ConfigMap
The radanalytics.io tooling uses
ConfigMaps as a method for
controlling how Spark cluster configurations are applied. When I launched the notebook
I named it notebook, I did this so that the deployment would create a service
with the same name. You can see it in the output from OpenShift:
$ oc get service
NAME           TYPE        CLUSTER-IP       EXTERNAL-IP   PORT(S)    AGE
notebook       ClusterIP   172.30.88.51     <none>        8888/TCP   12m
I need to inform my Spark cluster that the driver for it’s applications will be hosted by this service address. Since Kubernetes(and by extension OpenShift) allows pods to reference each other by service name, I will create a ConfigMap to address this concern.
In addition to the driver host, there is one other detail I noticed while putting these pieces together. Namely that the latest release of radnalytics.io is on Spark version 2.3.0, but it looks like the base-notebook is lagging a little behind.

Because of that I will need to use an older Spark image for my cluster. Luckily the Oshinko tooling makes this really easy. I just need to add an extra line to my ConfigMap to inform Oshinko that I would like a different default cluster image.
I create a file, which I just call nbconf.yaml, that contains the following:
kind: ConfigMap
apiVersion: v1
metadata:
    name: nbconf
data:
    sparkimage: radanalyticsio/openshift-spark:2.2-latest
    spark-defaults.conf: |-
        spark.driver.host notebook
This will create the necessary entries so that when Oshinko launches my cluster it will accept this data as the default configuration.
Creating the ConfigMap in OpenShift is then a simple command:
$ oc create -f nbconf.yaml
configmap "nbconf" created
Launch a cluster
I am going to use the Oshinko WebUI to launch my Spark cluster. I start by launching the webui application.
$ oc new-app oshinko-webui
--> Deploying template "jup/oshinko-webui" to project jup

     * With parameters:
        * SPARK_DEFAULT=
        * OSHINKO_WEB_NAME=oshinko-web
        * OSHINKO_WEB_IMAGE=radanalyticsio/oshinko-webui:stable
        * OSHINKO_WEB_ROUTE_HOSTNAME=
        * OSHINKO_REFRESH_INTERVAL=5

--> Creating resources ...
    service "oshinko-web-proxy" created
    service "oshinko-web" created
    route "oshinko-web" created
    deploymentconfig "oshinko-web" created
--> Success
    Access your application via route 'oshinko-web-jup.shift.opb.studios'
    Run 'oc status' to view your app.
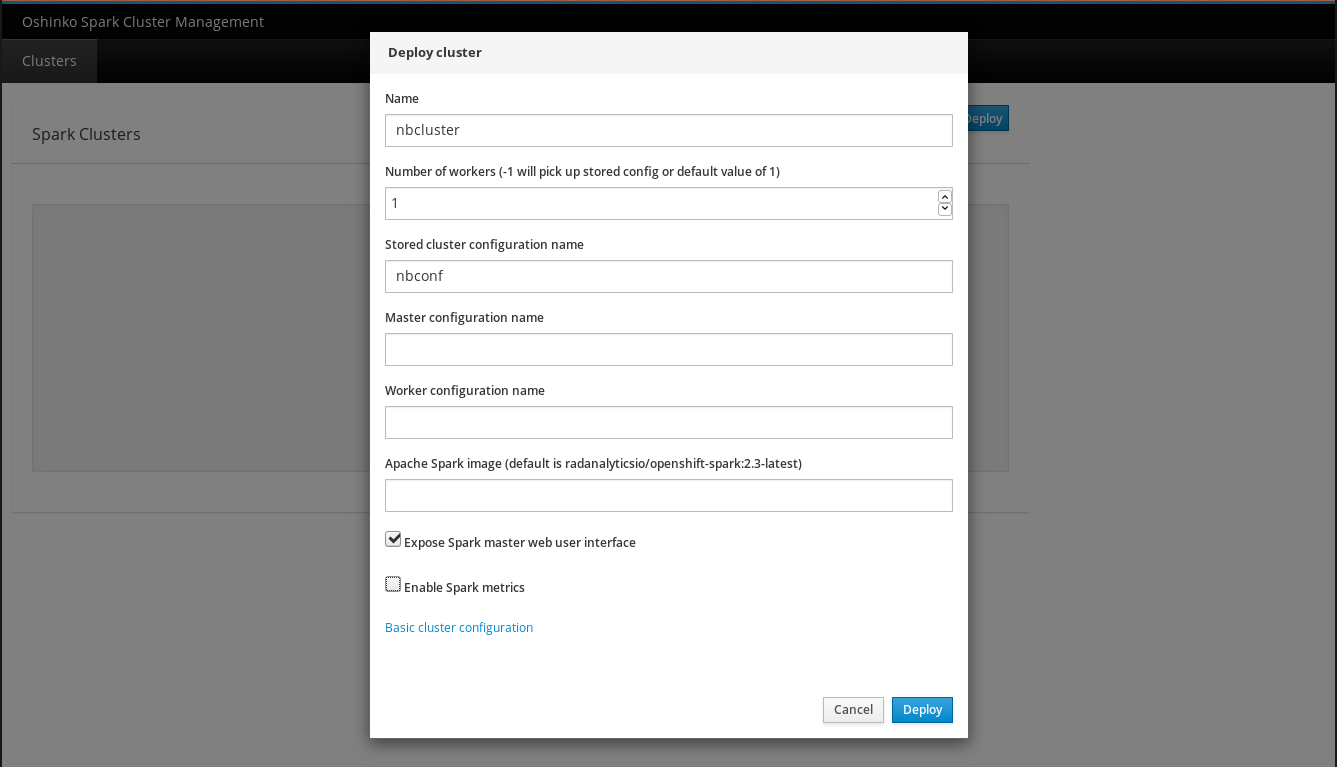
Next I open the exposed route in my browser, click on the “Deploy” button, and
then open the “Advanced cluster configuration”. On the advanced form I fill
in a name for my cluster(nbcluster), set the worker count to 1, and add the
name of my ConfigMap(nbconf) as the stored cluster configuration name. It looks like
this:

To complete the process I click “Deploy” and watch my cluster spin up to life.
One thing to make note of here is the name I used for my cluster, nbcluster.
I will need to use this name in my Spark master URL when I connect from my
notebook.
Connect to the cluster
The last step in all of this is to confirm that my notebook can talk to the cluster. To do that I open the link supplied in my OpenShift console to the notebook deployment and login. Then I start a new Python notebook and type this into the first cell:

I then execute that cell, cross my fingers, and hold my breath. Thankfully, it connected and I can now do a quick test to ensure that it is talking to the cluster.

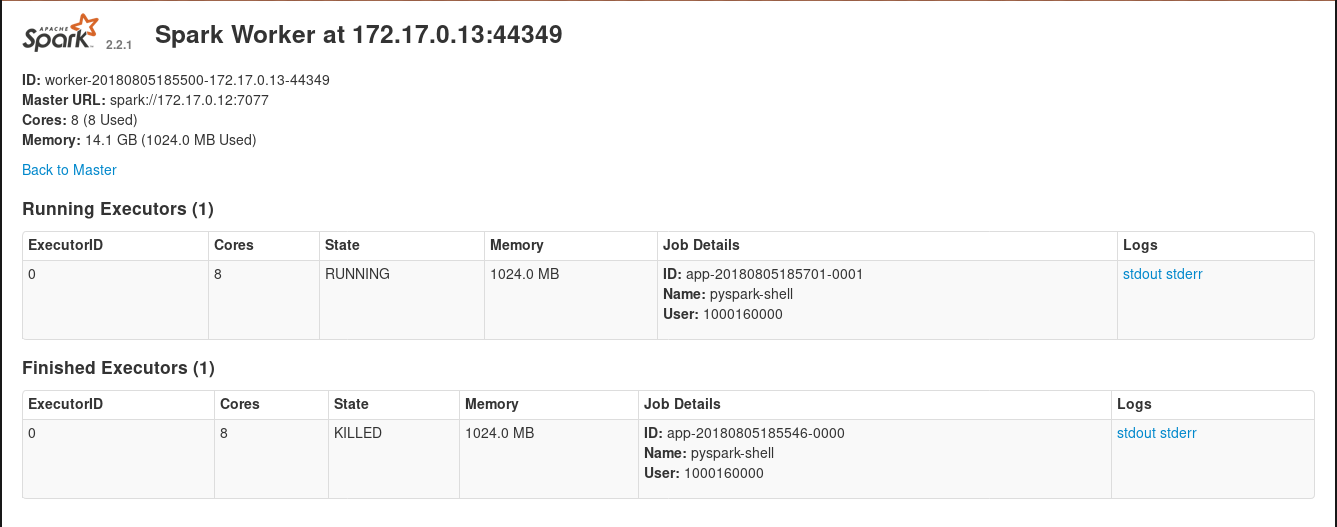
And just to really assure my confidence, I check the Spark webui by clicking on the link in my OpenShift console(inside the Spark master pod card), and looking at the running workers. From that page I can see that indeed an executor has attached and run.


Aw geez, that’s a lot of steps…
So, yes, there are quite a few steps involved with making this work out of the box. What I would love to see is this process getting bundled into the launch scripts for Jupyter in these images. I’m fairly confident that a simple template akin to the language source-to-image templates could be wrangled to help enable this. That template plus a new launch script could bring a similar level of functionality to Jupyter notebooks.
Additionally, I think we can create a default notebook that would inject the Spark cluster name and associated configurations as a sample notebook inside the running pod. This would give users a nice starting point for their experiments.
Stay tuned though, I am hoping that we will soon have an experimental deployer script for totally automated Jupyter notebooks with attached Spark compute coming soon.
As always, have fun and happy hacking =)